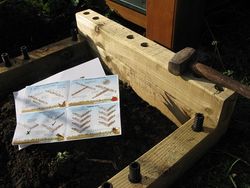
 Sunshine, a bag of blocks and a clear piece of ground. It was perfectly obvious what I'd be doing last weekend, after my WoodBlocX raised bed kit arrived last Friday.
You've surely seen WoodBlocX. Not only are they advertised widely in gardening publications, but they gained a certain kudos from attracting a £75,000 thumbs-up from Dragon's Den's Peter Jones when he offered to invest in 2012.
The raised bed I chose (kindly provided by WoodBlocX for review) is just about the smallest available - 2'6" square and 14 inches high (750 x 750 x 350 mm). Not an adventurous size, admittedly, but two adjacently placed raised beds 8' x 4' have taught me the extraordinary mound of soil that has to be moved in our otherwise imperceptibly sloping garden to provide a level footprint for long edges.
There turned out to be another reason, however, why I was profoundly relieved it wasn't any bigger.
About WoodBlocX
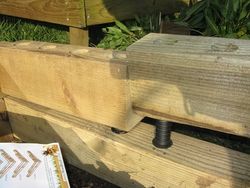 Before I go into that, though, there's a huge amount to like about WoodBlocX, including its desire to make its product as eco-friendly as possible.
- The blocks are made pine from sustainable forests
- The dowels are made from recycled plastic
- The mighty metal ground spikes are forged in the West Midlands
- The firm can trace its history in the timber business back to 1890
- You don't need to dig foundations, as you would with brick walls
- No cement needs to be lugged around
- The wood is guaranteed for 20 years, though, they say, will probably last longer
- It might work better than masonry in some situations, as wood will be more forgiving of tension forces and won't crack with ground movement or frost
Assembling the bed
The most important thing is to ensure the ground is level. I used a spirit level and sharp sand. It's fiddly, but sand makes it a lot easier.
I made sure that the first layer of bricks was near-as-dammit level (I admit that the bubble wasn't absolutely between the lines on each side of the square, but it was extremely close) and I ensured the blocks themselves sat level across their width. I'd already put in the dowels. The second layer of bricks was hammered on without problem - I thought the shorter bricks might jam against each other and the corners, as the fit was very snug, but a bit of bashing set them into place.
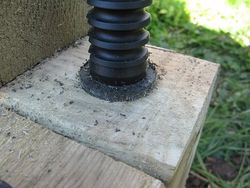 With the next set of dowels I had a problem. They have a flange that has to sit flush with the surface of the block, in the recessed holes. Most did, some wouldn't. I was inclined to ignore them, but just knew I'd be storing up trouble, as the next brick on top wouldn't sit down fully.
Getting a dowel out again proved beyond me. They have wedges in the end that jam into the dowel below. I gave in and fetched Husband. Husband, instead wrenching them out in manly, "Me, muscles" fashion, got canny, produced a file, and filed round the edge of the dowels till I could hammer them in flush.
The third layer of bricks proved harder to seat, as not all of the dowels lined up exactly. Here it became a two-man job as Husband levered one dowel into position with the flat of the file, while I bashed away at the brick. Was this a problem with the original soil levels or, as Husband pointed out, with the dowel holes, some of which looked ever so slightly offset?
After that came the coping. This went on without a problem, although you do have to saw the top of each dowel off to let the coping sit correctly.
My verdict
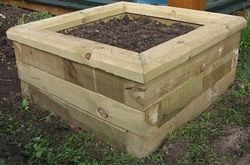 As I said, there's a lot to like about Woodblocx. The bed is very cute, and the bricks look smart. It's darn sturdy and although it comes with a mighty steel spike to bash into the ground through one of the empty dowel holes to anchor the bed in place, I didn't bother. I can't imagine it'll shift at all.
However, would I use it to make another raised bed? No.
First, price and time. The 8'x4' beds I have cost £80 each + £10 delivery from the local garden centre. They're very sturdy, made of 2 rectangles of roof joists placed on top of each other, screwed together with a metal plate on each side. Even along their length (2438 mm) they don't bulge. Once I'd levelled the ground, they went up in 10 minutes.
A similarly sized but slightly smaller Woodblocx raised bed would cost £213.98 + £35 delivery and, as I've explained, it doesn't slide together quite a smoothly as I'd like for that money. Also, according to the instruction leaflet that came with the kit, for every 1.5m of wall, you need to incorporate a buttress or cross-brace provided to prevent bulging. More bricks, more hammering. As it was, It took a good chunk of Sunday morning for us to finish.
Which brings us on to physical effort. Each layer of my very small bed required 20 dowels (actually I left 4 out of the top layer). The dowels, which it is recommended you bang into place with a 2lb lump hammer, needed, I found, at least 5 strikes to get them into place. That's a lot of hitting with a heavy object, and I can quite happily knock nails in with a claw hammer till the cows come home. I thought maybe I was being a wimp, but even Husband pronounced it consistently hard work.
By the end of the build, my wrists, elbows, shoulders and neck ached with a vengeance and continued painful for a couple of days. That was why I was profoundly grateful I hadn't chosen a larger structure.
Would I recommend Woodblocx?
 If you hanker after something that looks smart and different, and don't mind the cost or sustained hammering, then this will fit the bill. There are also the plus points listed earlier.
From their website, it's clear that you can construct all sorts of structures that are more complicated than a raised bed - even ponds and retaining walls. The one thing that might tempt me back are the round raised beds, as this is a shape you don't find often.
However, it's not Lego, whatever the impression. Wood is a forgiving material, but you still need to be very precise in levelling the ground. I could have done with dowels that fitted the holes and didn't need filing down. Some of the bricks needed their holes tidying up before use as the wood had feathered in places, and I did find that a couple of the coping pieces split slightly as they were hammered on. I also thought, for the price, it would be nice not to have to shorten the dowels in the final layer.
You'll probably find a number of WoodBlocX reviews popping up on blogs soon (if you're reviewing a kit, do let me know and I'll add a link here). In the meantime, pop over to Marksvegplot.
Mark's built a much bigger WoodBlocX raised bed and his experiences are worth reading as a comparison with mine. He doesn't mention the hammering, but neither did he use the wedges in the dowels, which I suspect would have made quite a difference to the effort involved.
I'd say that this is an interesting addition to construction options in the garden but, for anyone who is happy with a slightly more utilitarian look to their raised beds, WoodBlocX is probably better considered for more complicated structures than plain squares and rectangles.
UPDATE: WoodBlocX review from My Garden School's Andy McIndoe: How to Build a Raised Bed That Lasts on the Vegetable Plot
Vegplotting cunningly builds in advance: The One Where I Heart Raised Beds Even More
Of course, you'll just have to take my word for it, but, standing on the edge of the Laurent-Perrier garden at Chelsea Flower Show yesterday, I predicted to myself that it was quite possibly Best in Show.


Recent Comments